
Apple Pay
Apple Pay enables users to make payments using payment cards stored in Apple Pay or in the Wallet app (Apple Wallet). When a user decides to pay through this channel and is logged on his device into their Apple account, their preferred payment card is displayed. It is also possible to select another stored card and confirm the transaction with biometric using (Face ID, Touch ID) or a passcode, depending on the device and security settings. If the user is not logged in, an Apple account login form will appear. During payment processing, a one-time payment token is generated by the Apple, which replaces the card details during the transaction, enhancing payment security.
Payment via Apple Pay is available only on Apple devices, such as iPhone, iPad, MacBook and iMac. It is not possible to make payments on devices with operating systems other than iOS, such as Windows or Android.
Before you start
Ensure that:
- You have API authorization data.
- You handle transaction notifications.
- Card payments are enabled.
- Apple Pay payment channel is enabled.
Apple Pay transaction
Process Apple Pay payments using the transaction creation endpoint by providing channelId: 75.
Send a request to create an Apple Pay transaction
To create an Apple Pay transaction, send a POST request to the endpoint:
https://api.tpay.com/transactions
Check details in the API Reference documentation: POST /transactions
In the request, specify the following parameters:
amount * | Transaction amount. |
description * | Transaction description visible to the payer. |
payer.email | Payer's email address. |
payer.name | Payer's full name. |
pay.channelId | Payment channel identifier for Apple Pay: 75. |
* Fields required.
The basic request body should look like this:
{
  "amount": 0.1,
  "description": "Apple Pay test payment",
  "payer": {
    "email": "[email protected]",
    "name": "John Doe"
  },
  "pay": {
    "channelId": 75
  }
}
Example:
curl --location 'https://api.tpay.com/transactions' \
--header 'Authorization: Bearer <access_token>' \
--header 'Content-Type: application/json' \
--data-raw '{
   "amount": 0.1,
   "description": "Apple Pay test payment",
   "payer": {
      "email": "[email protected]",
      "name": "John Doe"
   },
   "pay": {
      "channelId": 75
   }
}'
After sending the request, you will receive a TransactionCreated schema in response.
Key response parameters:
result | success - Transaction was created successfully. |
status | pending - Transaction is awaiting payment. |
transactionPaymentUrl | URL to redirect the payer to. |
Example response:
{
  "result": "success",
  "requestId": "786dee7ec39502226238",
  "transactionId": "01K5BK4HEPB0WBCGT51FMTYSYJ",
  "title": "TR-CWM-D14339X",
  "posId": "ps_e4dkPVDEm4Jg726q",
  "status": "pending",
  "date": {
    "creation": "2024-07-04 21:15:23",
    "realization": null
  },
  "amount": 0.1,
  "currency": "PLN",
  "description": "Apple Pay test payment",
  "hiddenDescription": "",
  "payer": {
    "payerId": "py_a9rjlZWxRLdG1bqY",
    "email": "[email protected]",
    "name": "John Doe",
    "phone": "",
    "address": "",
    "city": "",
    "country": "PL",
    "postalCode": ""
  },
  "payments": {
    "status": "pending",
    "method": "pay_by_link",
    "amountPaid": 0,
    "date": {
      "realization": null
    }
  },
  "transactionPaymentUrl": "https://secure.tpay.com/?title=TR-CWM-D14339X&uid=01J1ZJREPKDXXJ5E4JRWYVXMN2"
}
Redirect the payer to the transaction panel
Redirect the payer to the URL provided in the response in the transactionPaymentUrl field.
At the provided URL, the payer will see a payment sheet with a list of available payment cards stored on their Apple account or an Apple account login form.
The payer selects a card and finalizes the transaction.
Payer will be redirected to the success or error page
When the Apple Pay payment is completed, the payer will be redirected to the success page or error page depending on whether the transaction was successful.
Handle notification
We will inform you about the transaction status via (transaction settlement notifications.) Check the details.
Apple Pay on-site
Apple Pay on-site is an integration of Apple Pay payments directly on your website/mobile app.
It involves embedding the Apple Pay payment mechanism in a way that allows customers to pay directly from your system/mobile app.
Depending on where Apple Pay is integrated, it comes in two variants that differ in how they are configured:
- Website integration (Apple Pay on the Web) — implementing Apple Pay in the browser using Apple Pay JS, with domain verification and merchant session handled on the server side.
- Mobile app integration (Apple Pay in-app) — implementing Apple Pay in iOS/iPadOS/watchOS apps using PassKit / Apple Pay APIs, including merchant ID setup and certificate configuration in the Apple Developer Account.
Website integration (Apple Pay on the Web)
Register your domain with Apple Pay
As a first step, you need to confirm that you have access to the domain on which you want to process payments. To do this, download the file:
https://secure.tpay.com/.well-known/apple-developer-merchantid-domain-association
Place it on your domain’s server at the following location. This file is used to verify the domain during registration. To verify the domain, Apple queries the registered domain, as shown in the example below.
https://{DOMAIN_NAME}/.well-known/apple-developer-merchantid-domain-association
This file is used to verify the domain during registration. To verify the domain, Apple queries the registered domain.
This address must be publicly accessible. It must not require authorization or contain redirects. There also must not be any other availability issues (e.g., server errors).
The next step in the implementation is to configure the previously mentioned domain. Log in to the merchant panel (Merchant Panel | Tpay), go to the Integration tab, and then select Apple Pay from the list.
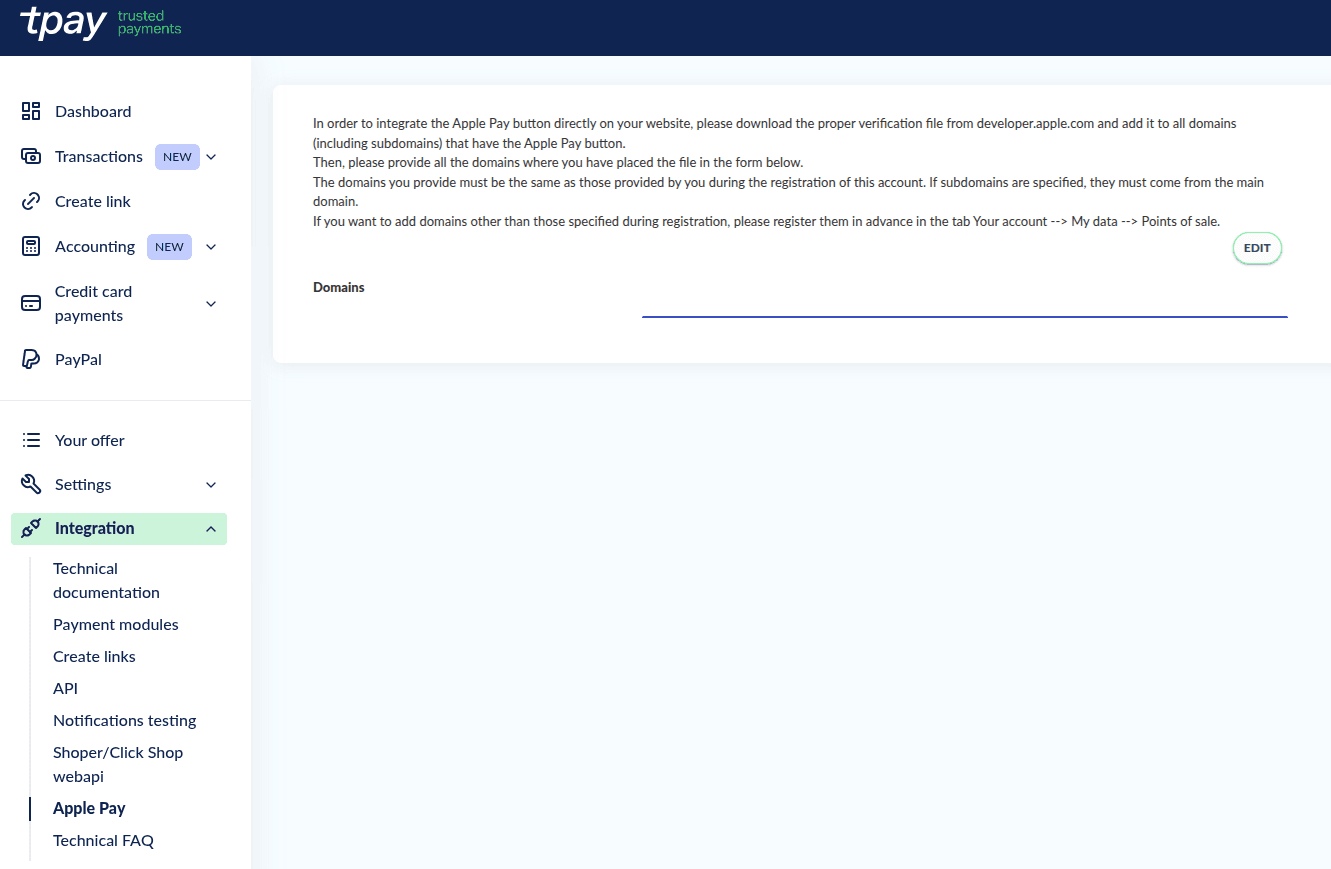
Then click the edit button and the plus icon on the left side of Domains. Enter the domain URL where the button is to be placed and save the settings. The merchant can add more than one domain. To define additional domains, use the plus icon again.

If the domain being added does not exist in the list of domains added during the merchant account registration, please register them first in the Your account > Your data > Sales Point tab.
Add the Apple Pay button
To generate the button, it is recommended to use the Apple demo page. You can find it here.
Implement the Apple Pay library
After generating the code, place it in the source code of the page where the payment is to be made. In the same place, implement the script used to handle the button.
Check the device
When running the code, check whether the device supports Apple Pay. To do this, check if the ApplePaySession object exists in the browser and whether the user has an active card with Apple Pay.
Configure the payment
After successful verification, create a new session where all payment details will be defined. Optionally, you can pass requiredShippingContactFields and requiredBillingContactFields, which allow you to receive shipping and contact information from the payer. More information on payment data can be found here..
// Apple Pay script version
const applePayVersion = 1;

// Payment data
const paymentRequest = {
  currencyCode: 985,
  countryCode: "POL",

  total: {
    label: "Payment description",
    amount: 10,
    type: "final",
  },

  supportedNetworks: ["visa", "masterCard", "electron", "maestro", "vPay"],

  merchantCapabilities: ["supports3DS"],

  //optional parameters
  requiredShippingContactFields: ["postalAddress", "name", "phone", "email"],

  requiredBillingContactFields: ["postalAddress"],
};
After creating the session, handle the merchant domain validation event. To do this, send a request to your backend environment, which will query the Tpay API at the POST /wallet/applepay/init endpoint and return the response to the frontend application.
Check details in the API Reference documentation: POST /wallet/applepay/init
Remember that the request to the POST /wallet/applepay/init endpoint in Tpay should be made from the backend, as this endpoint requires authorization. Do not share authorization data with third parties.
// Validate merchant domain
applePaySession.onvalidatemerchant = async function (event) {
  await fetch("/wallet/applepay/init", {
    method: "POST",
    headers: { "Content-Type": "application/json" },
    body: JSON.stringify({
      // Correct domain name ( same as in Tpay's Apple Pay Settings )
      domainName: "",
      // Name displayed when paying
      displayName: "",
      // The URL that is required to obtain an Apple Pay session
      validationUrl: event.validationURL,
    }),
  }).then(async (response) => {
    if (response.status === 200) {
      let json;
      try {
        json = await response.json();
      } catch {
        alert("Tpay error occurred");
        return;
      }
      applePaySession.completeMerchantValidation(response.session);
    } else {
      alert("Error occurred");
      return;
    }
  });
};
Mobile app integration (Apple Pay in-app)
To configure Apple Pay on-site in a mobile app, you need an Apple Developer account link.
Registering the certificate and merchant identifier
Register a Merchant ID:
- Log in to Apple Developer and go to Certificates, Identifiers & Profiles.
- From the left-hand menu, select Identifiers.
- Click the button to add a new identifier (the blue +).
- Choose the Merchant IDs type.
- Enter a Description and a Merchant Identifier (e.g., merchant.com.yourcompany).
- Click Continue, then Register/Save to save the Merchant ID.
After creating the Merchant ID, contact your Tpay account manager to:
- Provide your Merchant ID (this will make the next configuration steps easier and faster),
- Receive a CSR (Certificate Signing Request) file needed to generate the payment processing certificate.
Create an Apple Pay Payment Processing Certificate:
- Go back to Certificates, Identifiers & Profiles → Identifiers.
- In the filter list, select Merchant IDs and click your Merchant ID.
- The edit screen will open (Edit / Configure Merchant ID).
- In the Apple Pay Payment Processing Certificate section, choose Create Certificate / Create a New Certificate.
- In the Upload a Certificate Signing Request step, upload the CSR file you received and click Continue.
- Download the generated certificate apple_pay.cer and pass it to your Tpay account manager.
Apple Pay integration in the SDK
To integrate Apple Pay in the mobile app, use the Tpay SDK documentation or follow Apple’s instructions (available here).
Make a payment with an Apple Pay token
Send a request to create an Apple Pay transaction
To create an Apple Pay transaction, send a POST request to the endpoint:
https://api.tpay.com/transactions
Check the details in the API Reference documentation: POST /transactions
Specify the following parameters in the request:
amount * | The transaction amount. |
description * | The transaction description visible to the payer. |
payer.email | The payer's email address. |
payer.name | The payer's full name. |
payer.ip | The payer’s IP address (IPv4 or IPv6). Important note: required for integration with acquirer Pekao. |
pay.channelId | Payment channel identifier for Apple Pay: 75. |
* Fields required.
The basic request body should look as follows:
{
  "amount": 0.1,
  "description": "Apple Pay test payment",
  "payer": {
    "email": "[email protected]",
    "name": "John Doe",
    "ip": "127.0.0.1"
  },
  "pay": {
    "channelId": 75
  }
}
Example:
curl --location 'https://api.tpay.com/transactions' \
--header 'Authorization: Bearer <access_token>' \
--header 'Content-Type: application/json' \
--data-raw '{
   "amount": 0.1,
   "description": "Apple Pay test payment",
   "payer": {
      "email": "[email protected]",
      "name": "John Doe"
      "ip": "127.0.0.1"
   },
   "pay": {
      "channelId": 75
   }
}'
After sending the request, you will receive a TransactionCreated schema in response.
Key response parameters:
result | success - The transaction was successfully created. |
status | pending - The transaction is awaiting payment. |
transactionId | Unique transaction identifier - store it in your system. |
Example response:
{
  "result": "success",
  "requestId": "b72641d11e4edbaf6110",
  "transactionId": "01K5BK4HEPB0WBCGT51FMTYSYJ",
  "title": "TR-CWM-D14908X",
  "posId": "ps_e4dkPVDEm4Jg726q",
  "status": "pending",
  "date": {
    "creation": "2024-07-04 21:37:04",
    "realization": null
  },
  "amount": 0.1,
  "currency": "PLN",
  "description": "Apple Pay test payment",
  "hiddenDescription": "",
  "payer": {
    "payerId": "py_a9rjlZWxRLdG1bqY",
    "email": "[email protected]",
    "name": "John Doe",
    "ip": "127.0.0.1",
    "phone": "",
    "address": "",
    "city": "",
    "country": "PL",
    "postalCode": ""
  },
  "payments": {
    "status": "pending",
    "method": "pay_by_link",
    "amountPaid": 0,
    "date": {
      "realization": null
    }
  },
  "transactionPaymentUrl": "https://secure.tpay.com/?title=TR-CWM-D14908X&uid=01J1ZM04S5BJ9RFRMAT13NMPFQ"
}
Pay the transaction using the payment token
In this event, you need to send a request to your backend environment, which will query the Tpay API at the POST /transactions endpoint and return the result to the frontend application. The event also returns payer information (ApplePayPayment | Apple Developer Documentation ), which can be used to fill in transaction data. Shipping or contact data is available if specified in paymentRequest.
Pay the transaction using the payment token
To pay the on-site Apple Pay transaction, use the previously stored transactionId parameter, sending a POST request to the address:
https://api.tpay.com/transactions/{transactionId}/pay
Place the transactionID in the URL, for example:
https://api.tpay.com/transactions/01K5BK4HEPB0WBCGT51FMTYSYJ/pay
Check the details in the API Reference documentation: POST /transactions/{transactionId}/pay
Specify the following parameters in the request:
channelId * | Payment channel identifier for Apple Pay: 75. |
applePayPaymentData * | Encrypted payment token in base64 format. |
* Fields required.
The payment token is found in the payment.token.paymentData object. Encode its content using the base64 algorithm.
Implementation example:
// Payment finalization
applePaySession.onpaymentauthorized = async function (event) {
  if (event.payment || event.payment.token || event.payment.token.paymentData) {
    applePaySession.completePayment(ApplePaySession.STATUS_FAILURE);
    return;
  }

  //Get billingContact if required in paymentRequest
  //event.payment.billingContact
  //Get shippingContact if required in paymenRequest
  //event.payment.shippingContact
  await fetch("/transactions", {
    method: "POST",
    headers: { "Content-Type": "application/json" },
    body: JSON.stringify({
      base64_payment_data: btoa(encodeURIComponent(event.payment.token.paymentData)),
    }),
  }).then(async (response) => {
    let status = ApplePaySession.STATUS_FAILURE;

    if (response.status === 200) {
      let json;
      try {
        json = await response.json();
      } catch {
        alert("Tpya error occurred");
      }
      if (json.result && json.result === true) {
        status = ApplePaySession.STATUS_SUCCESS;
      }
    } else {
      alert("Error occurred");
    }
    applePaySession.completePayment(status);
  });
};
The basic request body should look as follows:
Handle notification
We will inform you about the transaction status via notification after the transaction is posted.
Display the transaction result
After receiving notification of the transaction status, use the tr_status field and display the transaction result.
Apple Pay documentation
For more information regarding the implementation of the Apple Pay payment button, please refer to the official documentation:
For security reasons, all requests sent to the Tpay API should be sent through your backend environment. This is because each request requires the transmission of credentials that should not be disclosed to payers. In the example, this has been implemented solely to facilitate understanding of the logic.
To increase sales efficiency and enhance the commercial use of this payment method, we recommend utilizing the extended integration capabilities, including functions such as delivery address, delivery options, and discount coupons.
The implementation of the extended integration on the store side, compared to the standard on-site Apple Pay button, only affects the step prior to obtaining the payment token from Apple and therefore does not impact the payment processing itself.
For more information on implementing the Apple Pay payment button, refer to the official documentation, specifically:
Apple Pay on the Web - https://applepaydemo.apple.com/, sections:
- Respond to payment sheet interactions
- Request a shipping address
Human interface guideline for Apple Pay - https://developer.apple.com/design/human-interface-guidelines/apple-pay
- Customizing the payment sheet