OroCommerce
OroCommerce is an advanced open-source e-commerce platform designed from the ground up to meet the specific and complex needs of the B2B market. The dedicated Tpay plugin allows for quick integration and access to a wide range of payment methods, including on-site solutions that enable transaction completion directly on the store's website.
Before you start
Requirements:
OroCommerce platform, at least version 6.0.x (6.1.x recommended).
Composer installed on the server.
Store set to Polish Zloty (PLN) currency.
An active Tpay account.
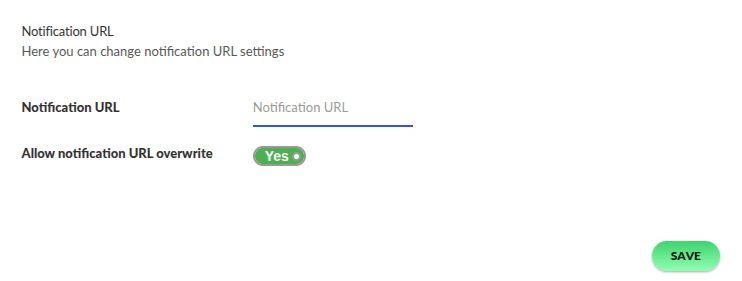
To correctly receive transaction status notifications, it is necessary to allow overriding the notification URL. In the Merchant Panel, go to the menu Settings → Notifications → in the Notification URL section, enable the option: Allow notification URL overwrite.
Additional module configuration options
During module installation, you have access to additional configuration options:
- Passing the field name from the
Customerentity; during communication with Tpay, the module will send the value of this field as the NIP (Tax ID) number to Tpay. By default, this option is disabled, and the NIP number is not sent to Tpay.
- Cache settings for the payment channel list, validation, and the list of available payment options (
Online paymentsmethod). Value expressed in seconds (default - 5 min).
- Automatic transaction cancellation setting in Tpay. Value expressed in days.
- Cron schedule definition for how often the background task should be performed (default is once a day during the night).
- By default, the plugin provides the
monolog.logger.tpaylogger, which stores all possible messages during communication with the Tpay API (the logger saves full communication to a file, including tokens, personal data, etc.). Log files are generated by default once a day in the/var/logsdirectory. - The module provides the
Macopedia\Bundle\TpayBundle\Event\PaymentSuccessfullyProcessedEventevent. It is responsible for notifications from Tpay informing about successful transaction processing. This is helpful if you want to change an operation in the application after a payment has been correctly processed by Tpay. - Within your application, you can override any part of the module, e.g., PHP code via DI (Dependency Injection) or appearance (CSS styles).
By default, the extension sends the client IP address to the gateway for processing in production environments; in development mode, this is disabled. Since the gateway validates IP addresses, ensure your server is properly configured to forward user IPs to the Oro application to avoid processing errors. For local development, please use OroCommerce in development mode.
Payment configuration
Go to System, then select Manage integrations.
From the list of integrations, select Create Integration.
In the integration configuration, select Tpay from the type list.

| Configuration field | Field description |
|---|---|
Typ | Integration type. |
Name | Name of the integration. |
Client ID | Available in the Tpay Merchant Panel under Integrations → API → Keys for the new Open API section in the Client ID field. |
Secret | Available in the Tpay Merchant Panel under Integrations → API → Keys for the new Open API section in the Secret field. |
Merchant ID | Merchant identifier. Also known as the ID number for logging into the Tpay Merchant Panel. |
Security code | Security code, available in the Tpay Merchant Panel under Settings → Notifications → Security section. |
RSA key for card support | RSA key, available in the Tpay Merchant Panel under Card payments → API → sekcja RSA public key ection for the Elavon acquirer (visible after enabling the securesale method), while for the Pekao acquirer, the key is located in the Integrations → API tab. |
Google Merchant ID | Integration of payments directly in your store. For this purpose, you must have production mode enabled in the Google Pay API in the Google Pay Business Console. Enter the ID assigned by Google in this field. Detailed information can be found in the Tpay documentation for Google Pay on-site payments. |
Apple Merchant ID | Integration of payments directly in your store. For this purpose, you must have a domain verified by Apple and a developer account created in Apple Developer. Enter the ID assigned by Apple in this field. Detailed information can be found in the Tpay documentation for Apple Pay on-site payments. |
Hide payment with redirection to Tpay Transaction Panel | Hides the payment method that redirects to the Tpay Transaction Panel. |
Production mode | Selection of the environment Tpay should operate on. Use data from the Merchant Panel for production environment integration. Use data from the Sandbox account for Sandbox environment integration. |
Labels for redirect payments | Name of the payment method displayed in the cart. |
Short labels for redirect payments | Name of the payment method displayed in the cart. |
BLIK labels | Name of the payment method displayed in the cart. |
Card payment labels | Name of the payment method displayed in the cart. |
Online payment labels | Name of the payment method displayed in the cart. |
Visa Mobile labels | Name of the payment method displayed in the cart. |
PragmaPay labels | Name of the payment method displayed in the cart. |
Apple Pay labels | Name of the payment method displayed in the cart. |
Google Pay labels | Name of the payment method displayed in the cart. |
Default owner | The owner of the integration. All entities imported from the integration will be assigned to the selected user. |
Additional configuration for Apple Pay on-site payments
For Apple Pay payments, in addition to entering a dedicated Apple Pay Merchant ID, verification of the store domain where the payment will be processed is required. To do this, enter the value required by Apple in the administrative panel of the sales platform.
Go to the System tab, then Configuration.
In the Commerce -> Sales -> Payment section, enter the domain value in the Apple Pay domain verification field and save the changes.

Enabling payment methods in the cart
To enable Tpay payments in the cart, you must prepare appropriate payment rules, where you choose which methods should appear for a given group of store customers.
Go to the System tab, then Payment Rules.
Create a new Payment Rule.

| Configuration field | Field description |
|---|---|
Name | Name of the payment rule. Not visible to customers. |
Sort order | The position the rule should take in the cart. |
Currency | Set to PLN. |
Destination | Rule restriction for a selected group of customers. Detailed information in OroCommerce documentation. |
Payment methods | Setting the order of displayed payment methods and their availability in the store. |
To allow customers to retry payment for unpaid orders, the Online payment with redirection method must be assigned to at least one active payment rule. If you use on-site payments, you can hide this method in the cart within the Tpay integration settings, leaving it available exclusively as a payment retry option. This mechanism relies on allowing payment to be completed on the Tpay Transaction Panel if the original payment failed – if no rule contains it or the conditions are not met, the payment retry function will not be displayed to the customer.
Processing refunds from the admin panel
Refunds in OroCommerce require special permissions. If you do not see this function in your panel, please contact your application's technical administrator for access.
- Go to the Sales tab, then Orders.
- Select the order you wish to refund.
- In the Payments section, click Refund or the specific transaction.
